Showing posts with label art. Show all posts

Tuesday, 10 March 2020

Identifying Plant Structures & Functions

We did a lesson on plant structures and functions a couple of years ago, when the twins were 4 1/2, so I thought we would repeat it now they're older (to see how much they remember/have improved!) and for Z's sake as a new lesson as she's recently turned 4. 😙

As before, we visited the Botanical Gardens. In the morning before we went, we read through the most relevant pages from the Roots, Stems, Leaves and Flowers book from the Fundamental Science Collection we have.

While at the gardens, we discussed the different kinds of plants and commented on how the same structure (e.g. the flower) could look so different on different plants. Did they all have roots and stems? Including trees? Could they find them? We stopped at a couple of points around the gardens so the girls could have a go at drawing some plants. They've not done much drawing from life so this was good practise! Z wanted to do one at first, but then she preferred just running around so I didn't force it. 😊 I modelled how to do a quick sketch first and then adding more detail afterwards.

This tree was outside, so after they identified the different structures I asked them what they thought about its trunk. Why was it twisted? Did it grow like that naturally or did someone make it grow like that? How? F said maybe they kept twisting the trunk as it grew. I'm not sure of the answer myself but that seems like it could make sense?! Maybe it's two different trees being twisted together as they grew? Even if we don't know the answer, thinking about it is still a useful exercise. 😁


We also took photos of the plants they were sketching. At home, they watched how I inserted a picture into a Word file and arranged it on the page. Then they had a go with the other photos we took. As well as inserting images, we paid special attention to cropping, resizing, moving them and using zoom to be able to see more clearly what we were doing. I printed the pictures out and they used them as reference to colour in their sketches with coloured pencils.


I was going to get them to label their drawings, but decided against it as felt it would be labouring the point... They already showed they understood by doing it verbally at the gardens, so what was the use in creating extra work as "evidence"?! 😏


On another day, we watched this video clip from the BBC: Ivy's Plant Workshop - Parts of a Plant.

The twins completed the following worksheet, with the guidance that the bottom of the flowering plant should be at the bottom of the table and the top should be at the top... They could either draw four separate diagrams or have a go at joining them to make one tall diagram spanning the table! We talked about the four structures (roots, stem, leaves, flowers) and their multiple jobs, and I wrote some keywords (mainly as spelling help!) on the whiteboard. If they needed more help, they could look in one of the Science books they have which I'd put in the book box for this half term.


When they were done, I asked them to draw and label a tree with the same four labels.

You can download the simple worksheet here.

Meanwhile, Z did the activity from our previous post, i.e. drawing a picture of a flower from scratch and me guiding her with adding labels. MashAllah the twins were able to work pretty independently so I was able to give Z enough attention!

Thursday, 12 December 2019

Light & Dark - Drawing Shadows

Target: Look for and measure shadows, find out how they are formed and what might cause the shadow to change.

We went on a shadow hunt around the house to see where there were shadows and why - what was blocking the light? Where was the light source?

On a piece of A4 white paper, I placed a toy animal on it and we used a lamp to create its shadow. I drew around the shadow (narrating what I was doing, including how difficult it was to not knock over the toy, or to see exactly where the shadow was when my hand's shadow got in the way, and look, I made a mistake here but never mind! - F, in particular, is still working on her growth mindset when it comes to difficult things and getting things wrong...) and coloured it in lightly with a coloured pencil. Then I repeated this process with different figurines and colours, overlaying shadows on purpose, to create this abstract artwork - revising earlier work on colours and blending.


They experimented with where they wanted to place the toy in relation to the light and saw how the shadow changed size or stretched. To make things fair, they kept switching seats so they could take turns being nearer or further away from the light source.


I wasn't expecting Z to write the title on hers, but she did while I wasn't looking and was very pleased with herself!

When they were done, they used their drawings to play a quick game of "guess the animal" with each other. 😄

----------

We discussed how to make a simple sun dial, recapping their knowledge on space and how the Earth rotates to create day and night. The book on Light and Dark in the KS1 Science series we have has a few pages on the subject which we read through together.

Before we made our sun dial, we recreated the theory behind how a sun dial works using a lamp to show how the shadow changes in quick time, moving across the ground, as the sun "moves across the sky". I had them predict what they thought the shadows would look like in the morning and evening and what time they thought it would be when the shadows are at their shortest (they correctly guessed stretched out and around midday!)

We tried making our own using paper plates with a pencil blu-tacked in the centre, but the weather this time of year was too overcast to see the shadows clearly. We might try again in the summer InshaAllah, but on a positive it was a good discussion point on whether sun dials were effective all year round or in all weathers!

----------

We drew some simple 3D shapes and learnt about shading to create a 3D effect. We started with a sphere, then a cone and finally a cube. We talked about where the shadow would be in relation to the light source in the picture. We also tried doodling other pictures, e.g. a tree, and I showed the girls how to draw simple prisms (recapping that a prism has the same 2D shape at each end!).

I bought some 3B pencils for this purpose and the girls discussed how the lead felt softer than their HB writing pencils and why it was easier to draw with the 3B pencil. They experimented with using different pressures to create lighter and darker effects.


----------

Finally, we watched The Gruffalo's Child (which happened to be on Amazon Prime) and talked about why the shadow was so large even though the mouse was so small! To help reinforce the point, we took out the torches again and played around with making shadows on the wall. 😁

Thursday, 21 November 2019

Seerah timeline (6-8)

Continued from this post...


Open Preaching

Coincidentally, the week we covered this part of the seerah, the Big Life Journal email that week (I recommend signing up to the free emails if you haven't already!) happened to be linked with a similar lesson to do with overcoming challenges: "Trees stand strong despite high winds because their roots are deep. Similarly, we can stand strong despite the challenges in our lives because we have deep roots which support us: loving people, thoughts, beliefs, values, and so on."

So as part of our reflection on this part of the Prophet (SAW)'s life, we completed the week's Big Life Journal activity together and stuck the finished poster in their bedroom, while reminding ourselves of the Muslims at the time going through their challenges (i.e. ridicule, torture, the boycott, etc.) but never giving up their faith.


We coloured a quarter of the poster each, since it printed on to 4 A4 sheets it was simplest to divide up the work this way (myself, the twins and Z) - and this also represented teamwork and the fact we all share the same roots with each other. I took this opportunity to teach the girls about blending and hues by having us all use colouring pencils. I demonstrated applying different pressure using the same pencil and the effect it had on the colour, as well as colouring lightly with two colours on top of each other so the change between two colours isn't so apparent.

Year of Sadness

We talked about why this time of the Prophet (SAW)'s life is known is the Year of Sadness/Sorrow, how he must have been feeling and why he was able to continue his mission despite that.

Continuing the theme of being strong like a tree, we compared this sadness to a huge challenge and Allah's love and Muhammad (SAW)'s strong faith as being his roots.

I Googled some random photos of landscapes to show the children, first "summer day landscape" then "icy landscape" and asked them how the pictures made them feel - what mood did they give and did they make you feel warm or cold? Then we Googled "flower field landscape" and talked about why these photos made us feel warm and happy - what did they have in common? Bright colours... What kinds of colours? Reds, oranges, yellows and they also said bright blues and greens. I Googled "cold colours landscapes" to show the girls and we talked about why these photos made us feel cold... They were mostly blue, purple and grey colours and they were dull not bright. Finally I googled "warm vs cold colours" to show them a diagram to illustrate that, yes, they were right and the red-orange-yellow side of the colour wheel is associated with warmth whereas the green-blue-purple side is cold.

Bringing them back to the main topic, I asked them if we were to paint something to represent this time of the Prophet (SAW)'s life, which kinds of colours would give the right mood? They answered the cold colours.

As we were talking, I was still scrolling through the example pictures on Google and we came across this one:

I really liked how it showed the contrast between the warm/cold colours in one picture. That's when I had the idea to create a similar painting rather than just doing one to convey a sad mood, and to link it to the growth mindset idea of being strong like a tree.

On a piece of A4 card, I demonstrated with Z how to draw round their hand as if it were the roots of a tree, their arm the trunk, and to flip the paper round to draw in the outline of the leaves at the top. This tree represented them and they were going to colour it in with all warm colours to show their strength, whereas outside the tree they were only going to use cold colours to represent the challenges they might come across - just as the Prophet Muhammad (SAW) still had Islam keeping him strong and warm inside despite everything going on outside him (e.g. Abu Talib and Khadijah passing away, being treated even worse by the non-Muslims, being stoned at Taif) which actually wanted to make him feel very sad and cold.

Because A needed her nap just then and I couldn't leave them unsupervised with the paints, the twins and Z agreed to use wax crayons to colour their tree and save the watercolors for the background. I said this was a good idea because the wax crayons would stand out more against the paint. They chose what they thought were the warm coloured crayons from the box, including some pinks and purpley-reds. I didn't correct them as I wanted them to experiment with the colours and see if they gave the desired effect... Once they were done colouring the tree it really did give a warm feeling overall, but once they painted in their backgrounds suddenly the purpley-reds stood out as being cold! We talked about why (the background colours made the purpley-reds look more purple) and they decided to go over these parts of their trees with orange and yellow paint, which helped make their tree feel warm again overall. A mistake which turned into a learning experience, and another thing to illustrate the importance of mistakes in helping us grow!


Isra' & Mi'raaj

I thought there wasn't a much detail in the 365 Days book as I would have liked, so I looked through the other books we had and was pleased to see this part of the seerah covered a little more in book 3 of the Safar series. So I read both the chapter from this book as well as the relevant pages in the 365 Days book for the girls to then write their fact summaries.

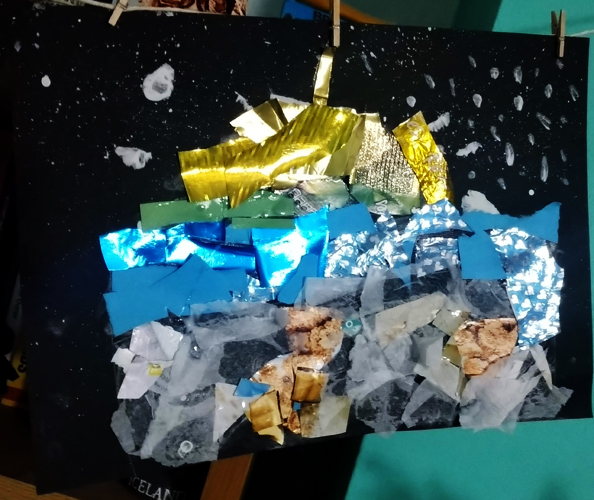
Bringing in our work on shiny surfaces and light reflecting, I thought it would be nice to do a collage of the golden dome at al-Aqsa. I read the chapter from Goodnight Stories with the Prophet Muhammad as a recap (we did this the following day) and the girls talked about which materials would be good to create the shiny golden effect of the dome.

We've not done any proper collaging before, so this was a good opportunity to cover another new thing from the art curriculum I shared in a previous post!

I left this page from the book open as inspiration:


We also looked at some photos of Al-Aqsa from Google and talked about how to draw it simply - they came up with a long rectangle with a semi-circle on top; the bottom half of the rectangle was grey/brown colours, the top half was blue/greys, then there was a thin stripe of greeny colours and finally the golden dome.

They decided to use black card for their picture and I demonstrated how to fill the paper with a simple outline on Z's card. Then we talked about how to achieve a starry sky effect and I told them about splatter painting.

First, they tried dipping their paintbrushes in white paint and flicking their wrist to get the paint to splat onto the background... It was a little difficult to get a strong enough flick and to not accidentally touch the paintbrush to the card! Then they tried running their finger through the bristles and found this a lot easier to flick paint onto their picture - but the stars effect was smaller. They also used a small paintbrush to dot stars on too (Z only wanted to dot with the paintbrush!).

While the paint dried, we looked through our scrap paper and old supermarket magazines (free from the till!) to choose materials which matched the colours they wanted. I demonstrated how to rip the pieces into smaller ones (telling them they could cut with scissors if preferred) and laid them out over one of their pictures. We talked about which looked more effective: lots of different smaller different pieces or just one big piece cut to size... They preferred the first option!

After around 1 hour of independent work, the three ended up with these:


(F, M, Z)

Tuesday, 19 November 2019

Arabic update

The twins have completed Madinah Arabic Reader Book 1 with me and we've just started Book 2, mashaAllah.

Their understanding is pretty good, as we read through the first chapter together and they had no issues with the content.

Current targets:
1) To be able to read more fluently (just need more practise, ideally daily!)
2) To be able to write simple sentences (they can spell words but don't have the confidence to write, especially joined... I need to give them more opportunities to do so!)

One of the grammatical concepts in the current chapter is the idea of the object of a verb in a sentence needing a fatha (and revising the subject needs a dhamma), i.e. "Tuhibbu al-baqaratu al-kitaaba" means "The cow likes the book" [as opposed to "Tuhibbu al-baqarata al-kitaabu" meaning "The book likes the cow"]. So we did some work on the whiteboard to this effect, using different familiar verbs and objects and emphasising that the order of the sentence isn't important, but the meaning comes from the vowel sound on the words.

Then the girls (Z included!) drew and painted a picture of 5 foods they liked to eat (so we could practise the verbs eat, like and want). They painted them with cottonbuds and a dot effect (I'm trying to introduce them to different art techniques where I can within other subjects, as we don't really have a set "Art" time atm!)


Tuesday, 12 November 2019

Art & Design Targets

http://art-techniques.co.uk/wp-content/uploads/2013/01/Progression-of-skills-KS1-KS2.pdf

I was looking for a set of discrete targets to follow when it came to Art, since it's not a specialist subject of mine, to ensure I introduced the girls to a variety of skills and not just the ones I was familiar with! I came across the above in Google and will be using it as a basis, inshaAllah.

I prefer to do Art as a cross-curricular subject along a theme (e.g. within Science or Islamic Studies, etc.) so this is a good checklist for me as inspiration for our work.

I've printed off a set of targets for each child and will highlight the relevant boxes as we cover each thing.

[EDIT:] https://webarchive.nationalarchives.gov.uk/20100607215842/http://www.standards.dfes.gov.uk/schemes3/subjects/?view=get

An old link but still useful reference point for targets across (non-core) subjects.

Saturday, 2 November 2019

Summer of Year 1 - Autumn of Year 2

A list of some of the things we've done over the last few months... No time for proper updates! SubhanAllah, my youngest brother was diagnosed with stage 4b lymphoma and things were a bit busy and a lot of going back and forth between Bristol, Birmingham and Ipswich. Alhamdulillah, he's finished his chemo course and seems to be doing well (and MashaAllah, the work we've done in Science recently on infection and the human body was really useful in the girls being able to understand pretty quickly why I was upset to hear the news and why we need to make lots of dua that Mamu gets better soon). Next time we visit will be next month, inshaAllah. 😄

So aside from the usual Literacy and Numeracy, guided by the Year 2 NC (going through the list and filling in all the gaps), we did the following:

1) Definition of habitats: research in non-fiction books, identify from fiction books, create a poster of a habitat of choice (including marking locations on a world map) which contained examples of plants and animals found in that habitat. Rehearse and give a presentation of their poster to each other, giving feedback on how to improve, then give an improved presentation to Papa. Convert their posters to PowerPoints (skills: typing, text boxes, inserting images, animations) and show this as a presentation to Papa.


2) Art trail around Ipswich, looking for Elmer statues. Map reading, walking, exploring, checking off a list, art appreciation & discussion... The girls then designed and named their own Elmers on pieces of scrap paper and compiled these into a booklet each. They tried to copy the art trail Elmers and came up with puns where they could!

3) Visit to a working water mill, where they grind their own flour and make their own bread - Tide Mill in Woodbridge. We took the train there with Nani, which was an experience in itself! The mill itself was really educational and child friendly. Definitely worth a visit if you're in the area! The girls got to help start the water wheel by turning a handle and follow all the ropes and pulleys to the top of the mill. They were able to identify where the old pulleys should have been connected in the roof for the bags of flour to be lifted through the hatch, and also understood the mechanism behind the cogs turning and affecting each other. While there we also did some bird spotting from the lookout area and talked about how the mill was connected to the river. This led onto discussions to do with water sources and the sea, which inspired some more visits whilst in Ipswich...


4) We went to Felixstowe beach twice - once on the train with Nani during the daytime and another at sunset by car with Papa. Both experiences felt completely different despite being to the same place, which led to some good discussions. On our first trip they had fish & chips and ice-cream on the pier, played in the sand and F was brave enough to paddle in the sea. On the second trip we went for a short stroll on the beach and they played in the sand by the light of some coloured string lanterns hung across the promenade. It was interesting to watch the sunset on the horizon and see how the sky changed colour and then how the sea faded to black so it was impossible to tell where the sea ended and the sky began - the only clues the sea was there at all were a few lights from ships far in the distance. This led to talks about lighthouses and on how vast the sea is.

5) We walked down to Ipswich docks (only 5-10min from my parents' house!) and compared how the water was flowing to the river we saw at Woodbridge. Why? M had the idea that maybe both the water in the docks and the water from Tide Mill would end up in Felixstowe to meet the sea, so we checked on Google maps by zooming out and saw she was right! We didn't have time this visit to see, but I'd like to take them to Orwell Bridge so they can compare how the river looks there to how it was after the docks (and also to the little streams we saw in Holywells Park).


6) Which is the most popular car colour in Ipswich? The twins came up with a method of answering this question (watch the cars on the main road outside Nani's house) and keep a tally chart. We repeated this on two different days and compared the results (the same top three colours but not the same most popular colour on each day!) then turned these results into a bar chart (column addition practise to collate their results from both days). I helped them with this through prompts and questions and then wrote some simple questions about their data for them to answer.


7) We went to a free pizza making workshop at Pizza Express, organised by another home ed mum. The 3 eldest girls learnt a little about Italy and why a margarita has that name (the colours of the Italian flag represented by the toppings), tasted some pizza toppings then made their own margaritas on a pre-made base. The next week they wanted to make pizza at home from scratch, so I found a simple dough using Greek yoghurt and flour they could do independently. They made the dough themselves while I helped with the oven parts and making the sauce (tomato puree, oil & herbs). They put all the toppings on themselves and decided to make tuna, sweetcorn, mozzarella and cheddar.


8) Bake Off inspired baking: taking it in turns to bake cupcakes with me, one person each week. They designed their cupcake on paper first (sponge flavour & decorations) then baked with my guidance (they did measuring themselves for once!). After we all had a turn, we discussed which bake was our favourite and why. Mine was mint chocolate and my favourite lol - will need to post recipe soon inshaAllah!

9) First piece of extended writing in a while... We're currently reading the Famous Five series together and they're really enjoying them, so I used this as a basis for their writing. After a particularly eventful chapter, we did some hotseating on the characters' thoughts/feelings then I modelled writing a simple diary entry on A3 paper. Together, we discussed what the features of a diary entry might be and annotated them on the paper. Then the twins wrote their own diary entries as different characters from the book. When they thought they were finished, they referred to the poster and added to their work.


10) Bouncing ball investigation (as M asked why did the ball bounce higher in the kitchen compared to the sitting room?). Discussed in terms of energy (potential, kinetic) and energy being absorbed. Twins came up with ideas on how to test these factors (i.e. strength of throw, height dropped, floor surface) and how to measure - describe in words or use tape measure? Both ways difficult but tape measure was preferred option! One of the results didn't match our predictions, so we did some further investigations explore why. M came up with hypothesis 1 and F with hypothesis 2, with them both working together to think of how we could test each one. We put both ideas together to come up with a reason to explain why that one result didn't match.