Showing posts with label trees. Show all posts

Sunday, 7 January 2018

Naming Deciduous and Evergreen Trees

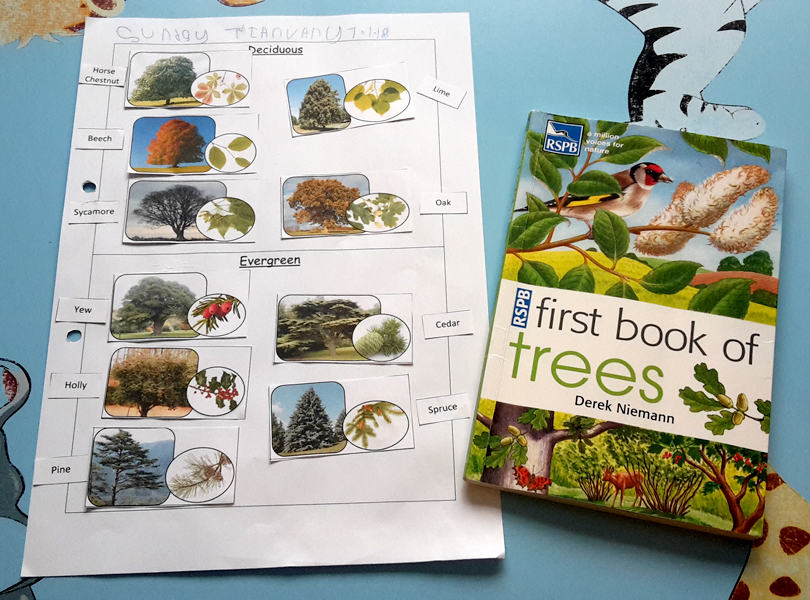
To finish off our topic on trees, I made a worksheet for them to sort 10 different trees into either deciduous or evergeen and then identify each tree by name by looking in a book.


We used the RSPB First Book of Trees (we found ours in our local charity shop for 49p!) as a reference point, which linked in with our work on non-fiction texts and using "fact books" to find information.

After cutting everything out, they began by sorting the pictures into deciduous or evergreen by focusing on the leaves - looking at their colour and shape. After they glued the pictures into the correct boxes, they took it in turns to look through the book for each name and try and match it to a picture. I deliberately chose photos which resembled the ones in the book to make it easier. 😛 So they read the relevant page out loud, looked at the images and compared what was there to what was on their sheet. Then they glued the label next to the correct picture.

They found the trees in the book either by using the Contents page or just by flicking through the pages - which led to a discussion into the benefits of having a Contents page!

You can download the worksheet here.

Since doing this work, it's been interesting to see the girls point out familiar trees by name when we're out and about, or ask to check if they've guessed correctly: "Is this a holly???" 😁😁

Tuesday, 26 December 2017

Labelling the parts of a tree and plant


The NC for Year 1 Science suggests children should know the main parts of trees and plants, so I decided rather than simply labelling a pre-printed diagram we could draw the pictures ourselves to label. These were both done as follow ups after looking at plants and trees at the park, allotments, Botanical Gardens etc. in person and physically exploring the different parts. You'll also notice the large gap in the dates they were done, too. 😗

We did the drawings as a copying exercise, but if your children are more artistically inclined you could probably get them to draw the diagrams themselves from a photo? Mine aren't (lol) so we did it step by step. On a piece of scrap A4, I drew each part of the plant/tree one thing at a time for them to copy onto their own paper, i.e.

For the tree:
1) grass
2) trunk
3) branches
4) leaves
5) roots
6) fruit
7) blossoms

For the plant:
1) grass
2) stem
3) flower
4) leaves
5) roots
6) fruit

They tried to name each thing as we went along but I neither confirmed nor corrected them at this point. 😊

When the drawings were done and while they were colouring them in, I wrote a list of words they needed to use as labels on the whiteboard.

We worked through the words together one by one, starting with the obvious ones at their choice. I modelled how to draw labels on my own drawing but they were free to place their own labels wherever they wanted on the picture - as long as it made sense and wasn't, for example, on the opposite side of the page! As they added the labels we recapped some of the things we knew about each thing, e.g. roots help keep the plant steady in the ground and drink up water, etc.

For the plant labels, the NC states children should know what a flower is and what petals are. I included the term "pistil" simply because I knew otherwise my girls would want to know why only the outside of a flower was labelled and not the centre. 😅 The details of male/female parts and exactly what comprises the centre of a flower can wait until later years though!

Wednesday, 1 November 2017

Mini Science Display: Prediction & Results


Some more posters for our front room. 😂

I decided to start planting the seeds for scientific investigations by getting the girls used to the words "prediction" and "results". One piece of coloured card/laminated paper per word:

PREDICTION: What do you think will happen? Why? What knowledge do you already have?

RESULTS: What happened? What does it mean? How does it compare to your prediction?

Underneath, I cut the sides off two plastic wallets and stuck them to the mini-posters. The idea being the headings and questions will stay displayed while the content of our current investigation/experiment can slot into the appropriate wallet.

----------

So to fit in with our topic on plants/trees, I took them to Birmingham Botanical Gardens (where we have a membership pass - we definitely make the most of it throughout the year, especially in the warmer months!) where we wandered around a bit looking at the different kinds of trees, discussing whether they were deciduous or evergreen and why. This was in September, but ideally you'd want to do this earlier before the colours of the leaves begin to change. The criteria we were focusing on were the leaf shape (flat, needles, spiky, etc.) and colour (light green, turning yellow/orange, dark green, shiny, etc.) When we got to the playground I directed them to look at two particular groups of trees: one group behind the roundabout /see-saw and the other behind the swings. We took some photos and looked at the leaves more closely so they could decide what kind of trees they thought they were, more independently since we'd already had plenty of discussion walking around the gardens.

When we got home, I printed out the photos onto A4 so we could recap what we did the next day. I explained to them what a prediction was and guided them in writing one by using the questions on the poster as prompts.

A few months later, in November when it was clear the season had changed and the trees would definitely be different were they deciduous, we went back to the Botanical Gardens and looked at the same trees in the playground. This was at the end of our trees topic so they were able to do this pretty independently, saying which group was deciduous and which was evergreen and why. We took some more pictures together and spent the rest of the time playing.

Again, when we got home I printed out the photos onto another sheet and went through the questions on the Results poster with them so we could write up our results together. These mini-posters will then stay on display until the next time we do an experiment, so serve as a nice reminder.

It wasn't really a proper experiment per se, as there was no real method, but I thought the activity served as a good introduction into the scientific process.